
Most programming projects take a long time because the same steps need to be repeated over and over: Painting the screens, choosing what tables to use, connecting to the database, specifying the lookups, sorting the data, etc. There's a pattern in there, but it usually gets lost as it is mixed in with the all the other requirements of the project.
Just as you expect a consistent interface from a word processor or drawing program, you should expect no less from a relational database program. By following a few simple guidelines (see “The Main Idea”), you can develop and use database applications with similar ease using the Traverser.
The Traverser runs on a web server, so it can run over the Internet or behind a firewall.
Once you set up and enter your database design, it takes care of the following:
Navigation
Editing
Sorts
Searches
Lookups
Possible uses for the Traverser include:
Prototyping database designs
Test data
Data entry
Catalogs or directories of information shared over the Internet
Hierarchical reference repositories shared over the Internet: Scientific, statistical, historic, geographic, etc.
While not in the scope of this release, the Traverser provides a solid foundation for adding or interfacing with the following functionality:
Business rules
Specialized validation
Formulas, calculations
Batch processes
Report writing
See “Customizing the Traverser” for ideas on these types of changes.
You can use the Traverser to browse and edit tables, or you can use the Traverser to create tables.
If you're using the Traverser to browse and edit tables, the main idea is to select a table from the top edge of the page, and then select a record from the left edge of the page. (To return, DON'T use your browser's Back button. Instead, use the button labeled <=.)
If you're using the Traverser to create tables, the main idea is to put a field named parenttablename_id at the beginning of each table, where parenttablename is the name of the parent table. This hooks all the tables together.
The interface that you use to browse and edit tables is the same one you use to create them. If you're creating tables, it is recommended that you first learn about relational database design and normalization. There are some informative articles on the web that can get you up to speed quickly.
This Help system contains a series of “how to” topics. While you can read them in sequence for a complete overview of the Traverser, you may be able to skip around to get the information you need.
Buttons that you click and text that you type will appear in bold type. Results displayed by the computer will appear in quotation marks (“”).
Sub-headings and important Traverser concepts are emphasized in italics.
If a word in this Help system doesn't make sense, you may be able to find a definition for it by doing a web search. Some sites specialize in computer terms, and you can bookmark them in your browser for future use.
While you're at it, you may want to open separate instances of your browser for this Help system and the Traverser itself. Then you can press Alt-Tab to switch between the different windows as you go. Or you can print the Help system.
If you prefer learning by doing, you may try reading only lines that are bulleted, like this one.
Items labeled “Technical note” can probably be ignored by most readers.
You can run the Traverser over the web, or you can install it on your own web server.
If you're running the Traverser as a user over the web, you can skip this section.
If you're installing it on your own web server, please read on.
The Traverser was developed using the LAMP environment. See “The LAMP Environment” for more information. Other environments may also work if they have MySQL and PHP.
The Traverser comes in a compressed file.
Copy the downloaded file to a folder of your choice, for example /usr/src.
Using a terminal command line, change to the directory you copied the compressed file to. For example:
cd /usr/src
Decompress the file:
gzip -d traverser-1.0.tar.gz
Extract the files to subdirectories:
tar -xvf traverser-1.0.tar
Four subdirectories are created. They are described below:
htdocs – Copy the files in this folder to the directory you use to serve web pages, for example /www/htdocs. This could be the directory specified as the “DocumentRoot” in /www/conf/httpd.conf if you are using Apache.
includes – Copy these files to a secure directory used for PHP include files, for example /usr/smbshr/includes. This could be the directory specified as the “include_path” in /usr/local/lib/php.ini. Open the files as_form02.inc and as_form_03.inc and change the host, user, and mpassword fields to fit your environment. These fields need to match whatever is in your mysql user table. For “host,” provide the name of your MySQL server computer.
mysql – This subdirectory contains the a_account MySQL database. This database contains the names and passwords needed to create new databases. Copy the file a_account_install to the directory where MySQL is installed, for example /var/lib/mysql. Change to the directory and type:
mysql -u root -p < a_account_install
If you use -p, you will be prompted for your password.
settings - This subdirectory is for informational purposes only. It contains settings, used by the original operating system, which may or may not apply.
To create a new database, add a row to the account table in the a_account database:
In your browser, locate your htdocs folder and open login.php.
Enter Database a_account, User Name admin, and Password Qqqqq1 and click Submit.
Click a_data.
Click 1.
Click account.
Click Insert.
Add a new database name and password and click Save.
Click <=. Repeat until you return to login.php.
Now you can log into the new database using User Name admin.
If you have a database name, user name, and password, you can enter them in the spaces provided on the main login screen (login.php).
Each database contains a collection of tables shared by a team of users. The first user for a database is given a user name of admin. Subsequent users are assigned by the admin user.
The user name field is not case-sensitive, but the password field is, so uppercase or lowercase letters in the password field must match exactly. For security purposes, the characters in the password field are masked.
Click the Submit button to proceed. The Traverser interface appears.
Note: Your browser may display messages having to do with encryption or remembering values. If you can disable these, that will facilitate the operation of the site.
You can change your password by filling in the “New Password” and “Confirm New Password” fields when logging in. The passwords in the two fields must match exactly. If accepted by the program, you can use the new password the next time you log in.
For security purposes, please follow these guidelines when choosing a new password:
Use 6 or more characters.
Include one or more of each of the following – uppercase letter, lowercase letter, and number. (Special characters are removed from all fields, including passwords, also for security purposes.)
Do not use your database name, user name, or any variation of either.
Do not use words that are in the dictionary.
Do not use names.
Do not use a date, phone number, or other value that can be guessed.
One suggestion is to use the first characters of a favorite phrase, mixing upper and lowercase and using numbers in place of some of the letters.
If you logged in successfully, you will see a web page with a drop list in the upper left corner, followed by a bunch of buttons.
To return to the login page, click the first button in the second row, the one labeled <=. This is the Traverser's Back button. It is recommended that you use this button, rather than your browser's Back button, whenever you want to return to the calling page.
To exit the Traverser completely, simply close your browser.
Since the Traverser is mainly focused on storing and retrieving data, it comes in black and white with plain fonts. You may be able to change the overall fonts and colors for your browser, and those should then be passed on to the Traverser.
Title Bar
Once you've logged in, the title bar for your browser (way up top, above the menu bar) contains the name of the currently selected table, followed by a value describing the currently selected row. By default, the topmost table, “a_thetraverser”, is displayed, followed by the id (identification number) for the row, which is 1. This is explained in more detail below.
First Row
In the upper left corner of the web page (below the browser menu bar and toolbars) is a drop list and a button labeled “Hop”. The drop list shows you where you have been in the hierarchy of tables, and the “Hop” button lets you return to one of those tables. See “Using the relation trail” for more details. The currently selected value in the drop list should match the value in the title bar, unless you're in the process of changing it. In your initial setup, only “a_thetraverser” appears in the drop list, because you are still on the topmost level.
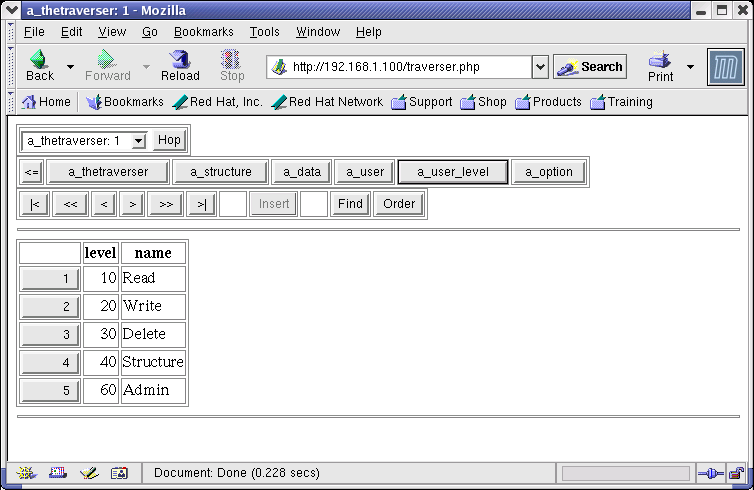
Make sure that “a_thetraverser” is the currently selected table. It should appear in the title bar and the label of the second button in the second row. If it is not selected, select a_thetraverser from the drop list in the upper left corner and then click the Hop button.

Second Row
The second row consists of a number of buttons. The first one is labeled “<=”. This is the Traverser's Back button. As mentioned in “Exiting the Traverser”, it is recommended that you use this button, rather than your browser's Back button.
Buttons to the right of the “<=” button contain the names of tables in the database. You will notice that all the initial table names begin with “a_”. This means that they were automatically added by the Traverser. They are used for setting up the database, and the “a_” prefix helps distinguish them from the tables added by your team. While the rows in some of the automatically-added tables can be modified by some team members, the columns cannot. When your own tables are added, you will traverse them the same way as the automatically-added ones.
Looking at the table names in the buttons in the second row, the first table is always the “parent” of the tables to the right of it. For example, a_thetraverser is a “parent” table, and it has five “child” tables – a_structure, a_data, a_user, a_user_level, and a_option.
Tables are described as “parent” and “child” because there is a “one-to-many” relationship between the tables, just as a person can have one or more children. For each row in the parent table, there can be many corresponding rows in the child table. The tables are related to each other, and the database is called a “relational database”.
Click the a_thetraverser button, if it is not already selected. (Selected buttons in this row will appear with a darkened border after they are clicked.) Notice that there is a single record. (Rows can also be called “records”, and columns can also be called “fields”.) The record has two fields, ID and database_name. This is Edit View, which is used for parent tables, and is described in more detail below.
Click the a_user_level button. A table appears with three columns and five rows. The columns are ID (which has no column heading label), level, and name. The rows have ID's of 1 through 5, one row for each user level. This is List View, which is used for child tables, and is described in more detail below.
The a_thetraverser record, then, has five a_user_level records associated with it.
Third Row
The third row contains navigation buttons.
The first six buttons are for moving from record to record, based on the starting sort order (described in “Structuring tables”). The buttons are, from left to right, First record (“|<”), Previous screenful of records (“<<”), Previous record (“<”), Next record (“>”), Next screenful of records (“>>”), and Last record (“>|”).
In List View, the “screenful” buttons show the next block of records that is after the last record displayed or before the first record displayed. These “screenful” buttons are disabled in Edit View because the records there are displayed one-at-a-time. To change the number of records displayed in a List View page, see “Changing user options”. Also, if you're using a 15” monitor or smaller with resolution of 800 x 600 or less, you may want to switch your browser to full-screen mode if possible.
Click the > button. The next record moves to the top of the list.
Click the >| button. The last record moves to the top of the list.
Click the |< button. You are returned to the first record on file.
The next button is the “Insert” button, followed by the “Delete” button if you are in Edit View. These buttons are disabled for automatically-added tables, or if the user level is not high enough. See “Inserting and updating rows” and “Deleting rows” for more information.
The next two buttons are for finding and sorting records. See “Finding rows” and “Sorting rows” for more information.
Edit View
Click the a_thetraverser button. The ID and database_name fields below are shown in Edit View.
The ID number is always automatically generated by the Traverser and can't be changed. It is used to uniquely identify each record, and to relate parent and child records with each other. Each time a new record is added, the ID number is incremented (added to) by 1. If a record is deleted, a gap in the sequence is created, but this does not affect the functioning of the Traverser.
The database_name field contains the name of your database. You can type other values into this field, but you can't save them because the Save buttons are disabled. Also, you can't add or delete records from this table, even if you have the privileges to do so, because the main purpose of this table is to provide a gateway to the other tables.
Edit View can be used to change the values in a table's fields. To add or change a field value, click in the field and type the new value. You may need to select the existing text and replace it. To save the data into the database, you must click the Save or Save and Insert buttons, if they are not disabled. See “Inserting and updating rows” for more information.
Only one record appears at a time in Edit View. By default, each field appears in its own row. Fields can also share rows in a word-wrap style. See “Changing user options” for more information.
List View
Click the a_user_level button. The rows and columns of the table are shown in List View.
Multiple records may appear in List View.
Here, the ID number is displayed in the label of the button in the leftmost column of each row. This is the ID number for the child (a_user_level) record, not the parent record. A column appears for each field in the table. If there are more columns than will fit in your browser window, a horizontal scroll bar will appear. If there are more rows than will fit in your browser window, a vertical scroll bar will appear, though this number can be adjusted (See “Changing user options”).
If you click the ID number button for a record, you go to Edit View for that record:
Click the button labeled 2. The “a_user_level” table is now the parent.
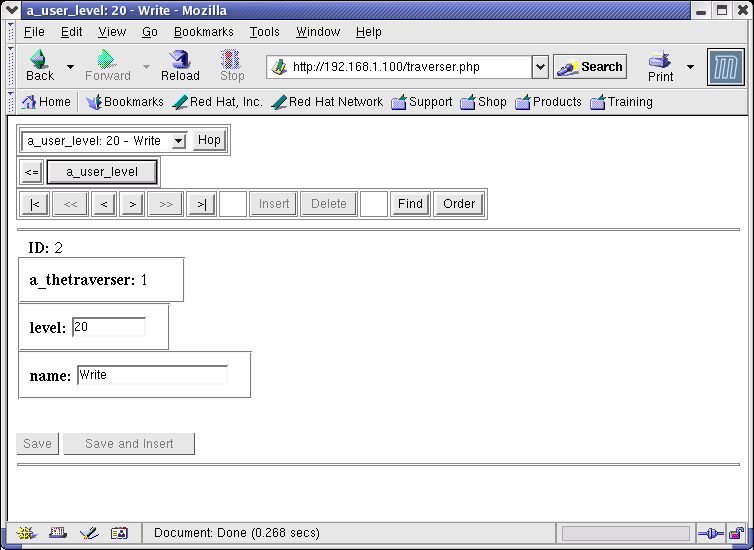
The table appears in Edit View, though this table is also read-only for most users.
If the a_user_level table had its own child tables, they would appear to the right of it in the second row of buttons.
Click the <= button. You are returned to List View for the “a_user_level” table. The “Write” user level appears at the top of the list.
Click the |< button. You are returned to the first record on file.
Click the a_structure button. A table appears in List View with a single row containing a note.
While the a_structure table is technically a child of the a_thetraverser table, it is effectively a one-to-one relationship (rather than one-to-many) because there is only one row in the table. Like the a_thetraverser table, it can't be edited. It's main purpose is to help organize the major branches of the application.
The note says “Click this row to add or drop tables, fields, or indexes”.
Click the button labeled 1. The “a_structure” table is now the parent.
The a_structure table has three child tables: a_table, a_field, and a_index. These are used for creating new tables and maintaining them, by users with “Structure” privileges. See “Structuring tables” for more information. They appear as read-only for most other users.
Click the <= button. The “a_structure” table is now a child table.
Click the a_data button. A table appears in List View with a single row containing a note.
Like a_structure, while the a_data table is technically a child of the a_thetraverser table, it is effectively a one-to-one relationship (rather than one-to-many) because there is only one row in the table. Like the a_thetraverser table, it can't be edited. It's main purpose is to help organize the major branches of the application.
The note says “Click this row to browse or edit your data after tables are created.”.
When new tables are added, they go here.
Click the a_user button. This is a list of users for your database.
Only the Admin level user can change these, but the a_user table has a child table named a_user_option, where users can change some of their basic settings. See “Changing user options” for more information.
Click the a_option button. This is a list of default options for your database.
These are used as a lookup for the a_user_option table.
NOTE: Sometimes unwanted characters appear on the page, or the page does not paint completely, perhaps as a result of streaming information over the Internet. If you suspect this has happened, you can refresh the current page by clicking the table button in the second row that you already have highlighted. If this doesn't work, or if the page goes blank, go ahead and try your browser's “Reload” or “Back” buttons.
Tables in the Traverser are organized in a hierarchy, like the branches of a tree. The “a_thetraverser” table is the trunk of the tree, and tables like “a_field” and “a_index” can be thought of as leaves on the tree.
The outline below shows the hierarchy. The tables beginning with “a_” in the name are the automatically-added tables that come with the Traverser. The other tables (company, customer, etc.) are the ones you add if you work through the examples in this Help system.
a_thetraverser
a_structure
a_table
a_field
a_index
a_parent_child
a_datatype
a_data
company
customer
invoice
lineitem
product
employee
a_user
a_user_option
a_user_level
a_option
While in an outline you're reading down the page to see the branches, in the Traverser you're reading across the top of the page. And while the outline uses indentation to show the children under the parent, the Traverser shows the parent and child buttons side-by-side, with the parent as the leftmost table button. Clicking the child table buttons and choosing their rows takes you into the branches – clicking <= moves you back toward the trunk.
The “a_parent_child” table shows relationships in the database, though not in outline format. It shows one record per relation, with the parent on the left and the child on the right.
In the upper left corner of each Traverser page is a drop list and a button labeled “Hop”. The drop list shows you where you have been in the hierarchy of tables, and the “Hop” button lets you return to one of those tables.
The hierarchy is formed by the chain of parent-child table relationships (See “Understanding the Traverser interface – Second row”). After selecting a child table, and then its child table, and so on, you can quickly become several levels removed from where you started. To show those levels, and to provide a convenient way to return to those earlier pages without repeatedly clicking the “<=” button, a trail of the relations is kept in the drop list.
Click the a_structure button. The “a_structure” table appears in List View.
Click the button labeled 1. The “a_structure” table appears in Edit View.
Click the a_datatype button. The “a_datatype” table appears in List View.
Click the button for the row with a name value of “CHAR”. The “a_ datatype” table appears in Edit View.

Click the down arrow on the right end of the relation trail drop list. Three tables appear in the list: a_thetraverser, a_structure, and a_datatype. Identifying information for the specific rows also appears in the drop list.
Select a_thetraverser from the drop list and click the Hop button. You are returned directly to the a_thetraverser table in Edit View.
Tables can be sorted by any field or combination of fields.
Note: Sorting may be slower on larger tables if there is not an index specified for the field or fields selected. To learn more about indexing, see “Structuring tables”. There you will also see how to specify a starting (or “default”) sort order for each table as viewed within its parent.
Click the a_user_level button. The “a_user_level” table appears in List View. By default, a_user_level is sorted by level.
Click the Order button. “Sort Order for: a_user_level” appears.

Every field in the table's List View appears in the “Field list”. To the left of each field is a drop list. By default, the number in the drop list is the number of fields in the main list plus one. This way, a unique lower number can be specified for any field.
To specify a sort order, select a number from the drop list for the desired field. The lower the number, the more “major” the sort, and the higher the number, the more “minor” the sort. In other words, a field with a number of 1 will be sorted first, and a field with a number of 2 will be sorted within that. For example, a table with people's names might be sorted by last name and then first name within that. The last name field would be assigned 1 and the first name would be assigned 2.
In the drop list to the left of the “a_user_level.name” field, select 1. Click the OK button. The “a_user_level” table appears in List View and is sorted by name. The “Read” user level is at the top because it has the lowest level number and was current when the “Order” button was clicked.
Click the |< button. The entire list appears, sorted by name.
The field or fields to find are always based on the current sort order. In this example, we search the a_user_level table's name field. See “Sorting rows”.
Click the Find button. “Find in: a_user_level” appears. A space appears for the “a user level name” field.

Type s in the space and click Find. The “a_user_level” table appears in List View. The row with “Structure” as the name appears at the top of the list.
The “s” you typed found the first letter in the word “Structure”.
Note: The result may be offset (the wrong record found) if the sort column contains null values (values that were never entered). To clear the offset, add a non-null sort value to the sort column, or delete the row with the null value.
If you know the table name and id, you can skip to it any record in the database.
Click the Find button. “Find in...” appears. In the lower part of the page, spaces appear for Table name and Id.
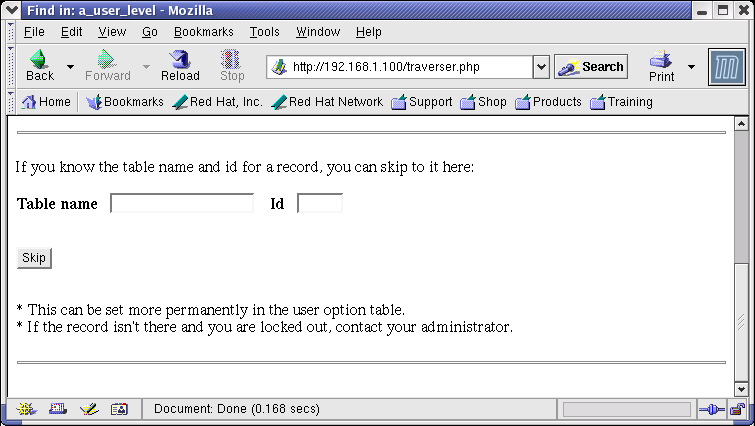
In the “Table name” field, type a_datatype. In the “Id” field, type 4. Click the Skip button. The a_datatype table appears in Edit View with the INT record shown.
You can configure the Traverser to skip to a particular record every time you open it. See “Changing user options” for more information.
If the table and id you entered are not in the database, then you will be sent back to the login screen, where you can log in again. If you've configured the Traverser to skip to a record that isn't there, you will be sent back to the login screen every time you login. This is easily fixed by the Admin level user, who can change options for any user. See “Changing user options” for more information.
A user level was probably assigned to you by your database's administrator, unless you are the administrator.
You may to choose to skip ahead to the Help topics that apply, depending on your user level.
To determine your user level:
Make sure that “a_thetraverser” is the currently selected table. It should appear in the title bar and the label of the second button in the second row. If it is not selected, select a_thetraverser from the drop list in the upper left corner and then click the Hop button.
Click the a_user button. A list appears consisting of user names, masked passwords, user levels, and user level names.
Find your user name in the “name” column.
If the list is long you may need to do a find. See “Finding rows.”
Check the corresponding value in rightmost column, labeled “a_user_level_name”. This is your user level.
There are five user levels. Each user level has its own privileges, plus all the privileges for the levels underneath it:
Admin – The Admin user level can add or remove users, and set the user levels for other users. The Admin can enter new passwords, but cannot see passwords changed by the user. If a password is forgotten, the Admin must create a new one. The Admin can also modify user level and option table information if necessary.
Structure – The Structurer can add and remove tables, the columns (also called fields) within them, and the starting sort orders (also called indexes) for each table.
Delete – The Delete user level can delete rows from tables, as well as insert and update rows.
Write – This level can insert and update, but not delete rows. This level may be useful for databases accepting input from unfamiliar users.
Read – This level can browse the data, but can't change it, except for the user's own password and options.
The corresponding Help topics appear below:
The Admin user level can add or remove users, and set the user levels for other users.
Users
Click the a_user button. The “a_user” table appears in List View.
Click the Insert button. A new record is created. See “Inserting and updating rows” for more information.
In the “name” field, enter the unique user name for one of your users.
In the “password” field, enter a secure, initial password for the user. See “Changing your password” for more information.
From the “a_user_level” drop list, select the appropriate user level.
Click the Save button. The changes are saved to the database.
Click the <= button. The new user appears in List View.
You can repeat these steps for each new user.
The Admin can enter new passwords, but, because they are masked for security purposes, you cannot see passwords changed by the user. If a password is forgotten, you must create a new one and tell the user what it is.
User options
While any user can change his or her own options, the Administator can change any user's options.
Click the id button for any user in the List View. The user appears in Edit View.
Click the a_user_option button. The options for the user appear in List View. This list will probably be empty if the database is new.
Click the Insert button. A new record is created.
From here you can set an option for the user. See “Changing user options” for more information.
If you do not wish to save an option right now, click the Delete button. If there were no other options saved, you will get the message “No a_user_option records found for a_user.” This is normal.
Click the <= button. You are returned to the user option List View.
Click the <= button. You are returned to the user List View.
User levels
Click the a_user_level button. The table appears in List View.
These records are used in the lookup for the a_user table. It should not be necessary to change these levels.
Overall database options
Click the a_option button. The table appears in List View.
Click the row with “name” of “gridrows”. The record appears in Edit View.
Here is where you can set default options for the entire database. If there is not a specific option set for the user, the program will look here to get the value. (And if it is not found here, it is “hard-coded” in the program.) For example, if you know that most of the people on your team use the same size monitor and browser, you can set the “gridrows” option to the optimal size for most users. Then specific users with different size monitors can set their own option accordingly. See “Changing user options” for detailed descriptions of each option. A brief description of each option also appears in the table itself.
Click the <= button. You are returned to the option List View.
The Structurer can add and remove tables, the columns (also called fields) within them, and the starting sort orders (also called indexes) for each table.
The following steps will create some example tables. You can delete them later, or use a prefix of your choosing to distinguish them from the tables you create later for your own purposes.
Tables
Click the a_structure button. The “a_structure” table appears in List View.
Click the button labeled 1. The record appears in Edit View.
Click the a_table button. A List View appears, showing the tables in the database.
Click the Insert button. A new record is created for adding a new table.

In the name field, type company and click the Save button. A new table named “company” is created in the database.
The Id field for the new table is automatically created when the table is. It is always the first field in the record, and is not visible when you add more fields to the table.
Note that the name field is “grayed-out” after you save it. The “Save” and “Save and Insert” buttons are also disabled. To modify a table, field, or index, it must be deleted and re-added. This facilitates the adding and dropping of those objects behind the scenes.
Table, field and index names have a maximum of 30 characters.
Fields
Click the a_field button. The “a_field” table appears in List View, with no records in the list.
Click the Insert button. A record is created where you can add a new field for the company table.
In the “seq” field, type 1.
The sequence number here tells the Traverser the order the fields will appear in the table. (Since the Id field is invisible, it is ignored in the sequencing.) To insert a field between two other fields, use the sequence number of the second field. The subsequent fields will be renumbered. They are also automatically renumbered when a field is deleted.
In the “name” field, type a_data_id. Important: This is where the parent-child relation is established. The characters “_id” at the end of the field indicate that this is a child table, and the characters before “_id” are the name of the parent table.
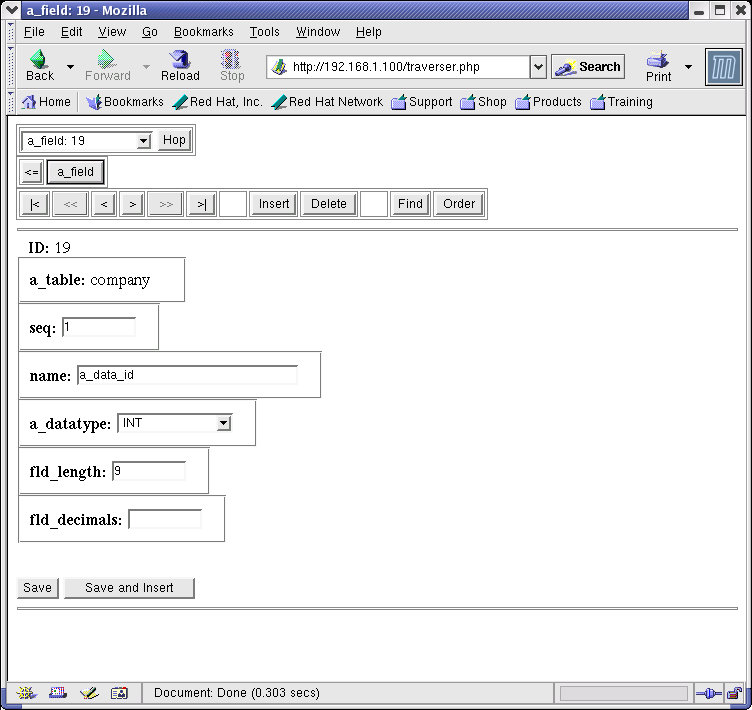
Therefore, “a_data” is the parent, and “company” is the child. To link the data in the two tables, the program compares the “id” field in the “a_data” table to the “a_data_id” field in the “company” table. In relational database terminology, “id” is the primary key in the “a_data” table, and “a_data_id” is the foreign key in the “company” table. A useful rule of thumb is that the foreign key in the child table is always equal to the primary key in the parent table.
From the “a_datatype” droplist, choose INT. This indicates that the field is a numeric integer--without decimals.
This space is where you specify the type of data that is sorted, whether it is alphabetic, numeric, a date, etc. While many data types appear in the list, only the most common types are supported in this release.
In the “fld_length” field, type 9.
This space is where you specify the length of the field. Here, we specify a maximum length of 9 digits.
NOTE: For foreign key fields (those with “_id” in the name), the data type must always be INT and the length must always be 9. This assures a match with the primary key on the parent table.
Click Save. The record you added is saved to the “a_field” table, and the “a_data_id” field is added to the “company” table.
Click Insert. A new “a_field” record is created.
In the “seq” field, type 2.
In the “name” field, type name.
From the “a_datatype” droplist, choose CHAR.
In the “fld_length” field, type 30.
Click Save. The record you added is saved to the “a_field” table, and the “name” field is added to the “company” table.
Click <=.
Click <<. You now have a table with two fields in it.

Indexes
Before we start using the new company table, let's specify a starting sort order to use when navigating it.
Indexes speed up sorts and searches by giving the computer a way to continually split the list in half using the process of elimination. The trade-off with indexes is that the more you have, the longer it takes to save the record. It is recommended that you use indexes only for the most commonly-used combinations of sort fields in your tables.
Click the a_index button. The “a_index” table appears in List View, with no records in the list.
Click Insert. A new “a_index” record is created. Up to 10 fields can be included in the index. We will skip the “name” field for now.
In the drop list for “a_field 01”, choose 1 - a_data_id.
In the drop list for “a_field 02”, choose 2 – name.
Click Save. The value “a_data_idx” is automatically placed in the “name” field. The “a_index” record is saved, and the “a_data_idx” index is added to the company table.

If the “name” field is left blank and the first field in the index is a foreign key, the “name” field is automatically created by adding an “x” to the end of the foreign key name. The suffix “_id” is short for “identifier”, and the suffix “_idx” is short for “index”. If the identifier and the index are both based on the same parent table, then the index is the “starting sort order” for the table, when viewed from the parent. For example, the “company” table will be sorted by name when we first access it from the “a_data” table. The first field in the index, “a_data_id”, speeds up the match with the “a_data” parent table (also called “filtering”, because only records that match are shown). The subsequent fields in the index (here it just the “name” field) determine the sort order you see, whether you are in List View or Edit View. This order can be temporarily changed later by the user when working with the table (See “Sorting rows”).
Click <=.
A table can have multiple indexes to improve performance (speed), but only the “parenttablename_idx” pattern will control the starting (default) sort order.
Just as a parent table can have multiple child tables, a child table can have multiple parent tables, even more than two! There is still a one-to-many relationship with respect to the rows in the tables. When a child table has multiple parent tables, a “many-to-many” relationship is formed between the parent tables. See “More tables” below for an example of this.
You may want a different starting sort order for a table, depending on which of its parents is currently being used. To do this, create a new index for each parent using the “parenttablename_idx” convention.
Note: The starting sort order is also in effect when a table is used as a lookup. The “lowest common parent” between a table and its lookup is used to determine the parent for the lookup.
Note: For readability and smooth operation of the Traverser, it is recommended that the table's leftmost fields be used for the indexes as much as possible.
Technical note: The “a_field” field is repeated 10 times in the “a_index” table. Normally these “repeating groups” would be avoided by creating a many-to-many relationship between “a_field” and “a_index”. The “a_field” field is repeated here to facilitate the creation of the index behind the scenes.
Using the company table
Let's take a look at what we have so far:
Click <=. List View for “a_table” appears.
Click <=. List View for “a_structure” appears.
Click a_data. List View for “a_data” appears.
Click the button labeled 1. Edit View for “a_data” appears. A button for the new “company” table also appears.
Click company. List View for “company” appears.
Click Insert. A new record is created.
In the “name” field, type XYZ Company and click Save and Insert. The record is saved and a new record is opened.
In the “name” field, type ABC Company and click Save. The record is saved.
Click <=. List View for “company” appears.
Note that the list is sorted by name, based on the index you created earlier.
More tables
Click <=. List View for “a_data” appears.
Click a_structure. List View for “a_structure” appears.
Click the button labeled 1. Edit View for “a_structure” appears.
Click a_table. List View for “a_table” appears.
Now, using the techniques described above, you can construct the following tables. If you need to drop a table, field, or index, simply click Delete while in Edit View. Note that if you try to delete a table before deleting its fields and indexes, you will get a message reminding you to do so.
Table: customer
Fields:
company_id, INT, 9.
name, CHAR, 30.
Index: company_idx (company_id, name)
Table: employee
Fields:
company_id, INT, 9.
last_name, CHAR, 20.
first_name, CHAR, 20.
middle_initial, CHAR, 1.
employee_id_mgr, INT, 9.
Index: company_idx (company_id, last_name, first_name, middle_initial)
Note the employee_id_mgr field above. The employee table is doing a lookup on itself. This is called a “self-join”. To specify a self-join, or to specify multiple lookups to the same table, add an underscore and an additional suffix after the foreign key's “_id” suffix. Self-join fields cannot be used in indexes.
Technical note: Issues may arise if there are multiple joins to the same table from different levels of a nested table relation.
Table: product
Fields:
company_id, INT, 9.
name, CHAR, 30.
price, DECIMAL, 6, 2.
Index: company_idx (company_id, name, price)
Table: invoice
Fields:
customer_id, INT, 9.
order_dt, DATE.
employee_id_rep, INT, 9.
Index: customer_idx (customer_id, order_dt)
Table: lineitem
Fields:
invoice_id, INT, 9.
product_id, INT, 9.
quantity, INT, 9.
Index: invoice_idx (invoice_id, product_id, quantity)
Note that the “lineitem” table has two parent tables, “invoice” and “product”. To form a many-to-many relationship, create a table with two or more parent tables. Here, an invoice can have many products, and a product can have many invoices. The lineitem table holds all the possible combinations.

Child sequence in parent
By default, the Traverser sorts the child table buttons in the second row alphabetically. You can override this by changing the child sequence.
Also, the program automatically creates a button for all child tables, even if the parent is only used for lookup purposes. While it won't hurt to leave these buttons in, you have the option to remove them.
First, let's examine the default arrangement:
In the relation trail drop list, choose a_thetraverser and click Hop.
Click a_data.
Click 1.
Click company.
Choose ABC Company. Notice that the child table buttons are in alphabetic order: customer, employee, product. We will change this later.
Click product.
Click Insert.
In the “name” field, type Candy Cane. In the “price” field, type 1.35. Click Save.
Notice that a child button appears for the “lineitem” table. Let's say that you don't want to see this button, and you only want to get at the lineitem table from the invoice table. We will change this also. (If you'd like, you can traverse over to customer and invoice now and see the other lineitem button. You may need to add some data along the way.)
Now, we will customize the defaults:
In the relation trail drop list, choose a_thetraverser and click Hop.
Click a_structure.
Click 1.
Click a_parent_child. This shows all the parent-child relationships in the database.
Click >> or other navigation button to scroll past the automatically-added tables. Notice that the “seq_in_parent” field defaults to “99” for all the newly-added tables. If this number is equal, the buttons will be sorted alphabetically.
Choose the row with parent of company and child of customer.
Change “seq_in_parent” to 1 and click Save.
Choose the row with parent of company and child of employee. (You can click > to do this.)
Change “seq_in_parent” to 3 and click Save.
Choose the row with parent of company and child of product. (You can click > to do this.)
Change “seq_in_parent” to 2 and click Save.
Click <=. Note that the sequence numbers are changed. This changes the child button sort order.
Choose the row with parent of product and child of lineitem.
Click Delete.
Click <=. Note that the row is removed. This removes the child button under product.

Now, if you traverse back over to the “a_data” side, the child button sequence for company should be customer, product, employee, and there should be no child button to the right of product.
Note: If you specify multiple lookups to the same table, only one row will be stored in the “a_parent_child” table. If you then remove one of those lookups (by deleting the “parenttablename_id_x” field in the “a_field” table), then the one row will be deleted. If this happens, you can add it back in manually.
Manual intervention
The structuring interface relies on the assumption that the a_table, a_field, and a_index values are synchronized with the actual tables in the database. If for any reason you believe these are out of sync, you can activate the “manual intervention” option. This lets you change the values in the automatically-added tables without affecting the underlying database. To set the option, see “Changing user options.”
Note: The examples here are based on the ones described in the Structurer's instructions (See “Structuring tables”), but the concepts can be applied to any table. See also “Understanding the Traverser interface” for more background information.
In the relation trail drop list, choose a_thetraverser and click Hop.
Click a_data. The “a_data” table appears in List View.
Click 1. The “a_data” table appears in Edit View.
Click company. The “company” table appears in List View. (If there are no records, click Insert to add one as described for “customer” below.)
Choose ABC Company (Click the button on left end of the row). The “company” table appears in Edit View.
Click customer. The “customer” table appears in List View.
Click Insert. This creates a new record in the “customer” table.
The link to the parent table is established when you click the “Insert” button. If you decide you don't want to insert a record, then click Delete before you move off the record. If you forget to delete it, you (or whoever has “Delete” privileges) can delete it later after refreshing the List View for the table.
In the “name” field, type SweetCo, Inc. and click Save. The record is saved to the database.
Click Insert.
In the “name” field, type RipCo, Inc. @#% and click Save. Notice that the special characters are removed from the field when it is saved. This is for security purposes.
Click <=. The “customer” table appears in List View.
Click product. The “product” table appears in List View.
Using the same techniques, add the following rows to the product table. Note that you can combine the functionality of the Save button and the Insert button by clicking the Save and Insert button in Edit View.
Candy Cane, 1.35 (This record may already be there.)
Cotton Candy, 1.99
Chocolate, 1.45
Now, find the employee table and click Insert. Notice the last field, “employee mgr”. This is a lookup to the same table (employee), called a “self-join” (See “Structuring tables”). It is blank to begin with, but will fill up as you add rows to the employee table. Later you can go back and choose from this field if you'd like.
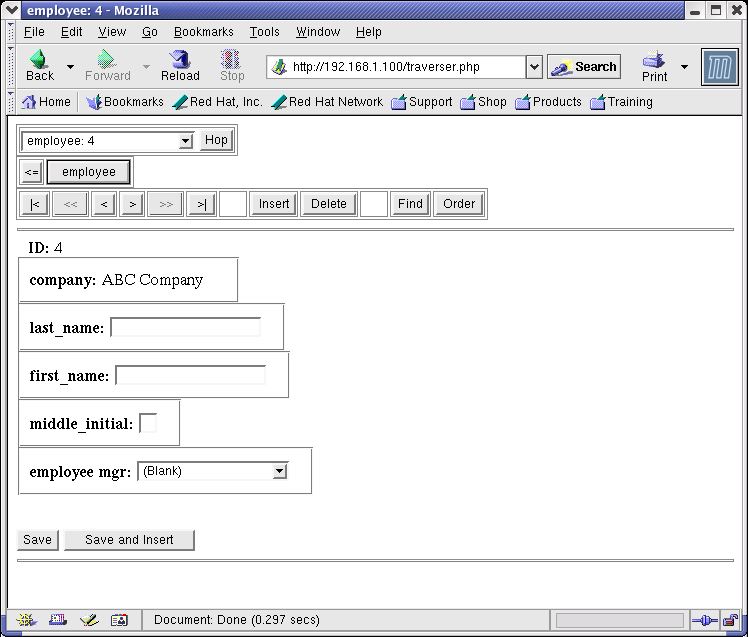
Add the following rows to the employee table:
Johnson, Harold R
Fogel, Beatrice S
Hayes, Fred E
Click customer.
Choose SweetCo, Inc.
Click invoice.
Click Insert.
Add the following data:
20030801, Hayes – Fred -E
20030802, Fogel – Beatrice – S
Click lineitem.
Click Insert.
Add the following data:
Chocolate – 1.45, 12.
Chocolate – 1.45, 3.
Cotton Candy – 1.99, 4.
Candy Cane – 1.35, 1.
Click <=.
Click |<. The “lineitem” table appears in List View.
The lineitems are sorted by the name from the product table, based on the lookups and sort orders entered by the Structurer. If the product name is the same, the rows are sorted by quantity.
Note: The examples here are based on the ones described in the Structurer's instructions (See “Structuring tables”) and the Writer's instructions (See “Inserting and updating rows”), but the concepts can be applied to any table. See also “Understanding the Traverser interface” for more background information.
In the relation trail drop list, choose company: ABC Company and click Hop. If it is not in the list, see if you can find it by traversing from the top down.
Click customer.
Choose RipCo, Inc.
Click Delete. The record is removed from the database.
Orphans
If the record you are trying to delete has child records that have not been deleted, you will receive a message reminding you to do so. Records without parents are called “orphans” and are not allowed by the Traverser because there's no way to get at them. They must be deleted manually in this release.
Choose SweetCo, Inc.
Click Delete. A message appears saying that the record is not deleted.
Click customer. The message goes away.
If you want to practice deleting orphan records, you can create new records and then delete them.
Note: The examples here are based on the ones described in the Structurer's instructions (See “Structuring tables”) and the Writer's instructions (See “Inserting and updating rows”), but the concepts can be applied to any table.
Most of the skills needed for browsing are covered in “Understanding the Traverser interface”. Here we take a brief tour of the example tables.
After logging in with Read privileges:
In the relation trail drop list, choose a_thetraverser and click Hop.
Click a_data. The “a_data” table appears in List View.
Click 1. The “a_data” table appears in Edit View.
Click company. The “company” table appears in List View. (If there are no records, click Insert to add one as described for “customer” below.)
Choose ABC Company (Click the button on left end of the row). The “company” table appears in Edit View.
Notice that the “Insert”, “Delete”, “Save”, and “Save and Insert” buttons are disabled. You can modify fields, but the changes can't be saved to the database.
Click customer
Choose SweetCo, Inc.
Click invoice.
Choose 2003-08-02, Fogel, Beatrice S.
Click lineitem.
Choose Cotton Candy.
If you now check the relation trail drop list, there should be six levels.
Click <. You are moved to the previous record.
See also “Sorting rows” and “Finding rows”.
Click <= six times to exit, or use Hop.
For just about every mouse action in the Traverser, there is a corresponding keyboard shortcut.
Alt-h: Hop
Alt-~: Back, Cancel, or Reset
Alt-1: Parent table (Edit View)
Alt-2: First child table (List View)
Alt-3: Second child table (and so on)
Alt-Shift-~: First record (List View)
Alt-Shift-1: Previous page (List View), First record (Edit View)
Alt-Shift-2: Previous record
Alt-Shift-3: Next record
Alt-Shift-4: Next page (List View), Last record (Edit View)
Alt-Shift-5: Last record (List View)
Alt-i: Insert
Alt-Shift-_: Delete
Alt-f: Find
Alt-o: Order or OK
Alt-s: Save or Skip
Alt-n: Save and Insert
The tab key can be used to move from object to object. In List View, the tab key takes you to the first button in the list, and then moves to the buttons beneath. In Edit View, the tab key typically takes you to the first editable field, and then to subsequent fields. Use shift-tab to cycle backward through the fields or objects.
When a drop list is selected, you can use the up and down arrow keys to move within the list.
You can customize some aspects of the Traverser interface.
Make sure that “a_thetraverser” is the currently selected table. It should appear in the title bar and the label of the second button in the second row. If it is not selected, select a_thetraverser from the drop list in the upper left corner and then click the Hop button.
Click the a_user button. A list appears consisting of user names, masked passwords, user levels, and user level names.
Find your user name in the “name” column.
If the list is long you may need to do a find. See “Finding rows.”
Click the id button in the List View. The user appears in Edit View.
Click the a_user_option button. The user options appear in List View. This list may be empty.
Click the Insert button. A new record is created.
From here you can set an option for the user.
From the “a_option” drop list, choose an option (See below for details).
In the “setting” field, type the appropriate value.
Click Save. The change will take effect the next time you use that feature.
The possible options you can change are as follows:
Droplist_max (default value is 50): This is the maximum number of rows that can appear in a drop list lookup. If the lookup has more than this number of rows, a button to a separate page is provided instead. Setting this number too high may affect performance.
Gridrows (default value is 12): This sets how many rows at-a-time appear in list view. You can adjust it to fit the size of your monitor and browser. You can also set it to a high value and scroll, though a very high number may slow performance.
Headroom (default value is 0): The number of rows above the selected row, when returning from editing.
Line_breaks_for_edit_fields (default value is 1): If this is set to 1--On, there will be a line break between fields on the edit page. If it is set to 0--Off, the fields will wrap at the right edge of the browser.
Line_breaks_for_find_fields (default value is 1): If this is set to 1--On, there will be a line break between fields on the find page. If it is set to 0--Off, the fields will wrap at the right edge of the browser.
Manual_intervention (default value is 0): This setting is only needed if a problem arises adding or dropping tables, fields, or indexes. Default is 0--Off. When set to 1--On, table structure information can be edited without affecting the underlying table. Take care to keep the info in sync when using this option.
Skip_to_id (default is blank): If this is set, along with skip_to_table, the selected record will be displayed when first opening the Traverser.
Skip_to_table (default is blank): If this is set, along with skip_to_id, the selected record will be displayed when first opening the Traverser.
If you've configured the Traverser to skip to a record that isn't there, you will be sent back to the login screen every time you login. This is easily fixed by the Admin level user, who can change options for any user, unless, of course, the Admin user has made the same error, in which case you will need to contact the server administator.
How you customize the Traverser is up to you. Here are some ideas:
The update_record function could be a good branch point for specialized validation, business rules, formulas, and calculations, before saving records to the database.
Data is stored in MySQL format, so any compatible report writer or batch process can be used with the Traverser.
Please see “The LAMP Environment” and “Licensing Requirements” for more information.
The Traverser was developed using the following tools:
Linux, Red Hat 8.0 (Operating System) www.redhat.com
Apache 1.3.27 (Web Server) www.apache.org
MySQL 3.23.56 (Database) www.mysql.com
PHP 4.3.1 (Programming Language) www.php.net
The Traverser does not modify or distribute these tools. They can be obtained separately from the respective vendors.
The Linux, Apache, MySQL, and PHP (LAMP) software is licensed so that anyone can read the program code. The LAMP software is also available free of charge from the respective vendors (though reasonably-priced CD's make it easier to install Linux). Please see their sites for specific licensing information.
The Traverser
Copyright (C) 2003 Tom Cleland
This program is free software; you can redistribute it and/or modify it under the terms of the GNU General Public License as published by the Free Software Foundation; either version 2 of the License, or (at your option) any later version.
This program is distributed in the hope that it will be useful, but WITHOUT ANY WARRANTY; without even the implied warranty of MERCHANTABILITY or FITNESS FOR A PARTICULAR PURPOSE. See the GNU General Public License for more details.
You should have received a copy of the GNU General Public License along with this program; if not, write to the Free Software Foundation, Inc., 59 Temple Place - Suite 330, Boston, MA 02111-1307, USA.
GNU General Public License (local copy)
GNU General Public License (on the net)
E-mail can be sent to the following address:
thetraverser at comcast dot net
(The words “at” and “dot” are spelled out here for security purposes.)
Postal mail: 2117 Marquis Rd., Golden Valley, MN 55427
![]()
![]()
Copyright © 2004 Tom Cleland
Revised: May 12, 2004